How to keep your kids safe with Windows Security Parental Controls
Keep the little ones safe while using a Windows 10 PC.
Windows Defender has evolved from a fairly basic antivirus app into a fully-featured Windows Security suite with access to not only virus protection but also some handy tools for keeping Windows 10 running at peak performance.
Windows Security, in its current form, provides easy access to and integration with Microsoft Parental Controls (found under “Family options”), which helps parents set up various controls and restrictions for younger family members.
This Windows 10 guide will walk you through setting up and managing Parental Controls using Windows Defender. This is especially handy if your kids are currently off school due to the current pandemic.
Everything you need to know about Windows Security
Starting a Windows family
It’s easy to access the Family Options in Windows Defender. Here’s how:
- Hit Windows Key + Q to bring up the search.
- Input “Windows Security.”
Select Windows Security from the list.
- Choose “Family Options” from the dashboard.
Unfortunately, Family Options within Windows Security is not fully integrated yet. While Microsoft has clearly worked on adding a few features that allow you to glance at this dashboard without having to hit up the company’s website in a browser, you will have to do so if you need to make a few changes.
Two links are available within this section of the Security Center. One takes you to family settings and another to a list of devices currently enrolled on the family plan.
The Microsoft website lets you:
- Choose what sites your kids will be able to access (in Microsoft Edge).
- Set when kids are allowed to use their devices.
- Receive weekly reports of child activity.
- Set which kids are allowed to purchase items from the Windows Store.
- Monitor the health and safety of all family devices.
- Avoid surprise spending.
- Configure Android phones through Microsoft Launcher.
Adding new family members
To add new family members (and manage ones already on the family plan), follow these steps:
- Click on “View family settings.”
- Sign in on the Microsoft website (if you’re not already logged in).
Click “Add a family member”. You may need to hit “Create a family group” if one isn’t present.
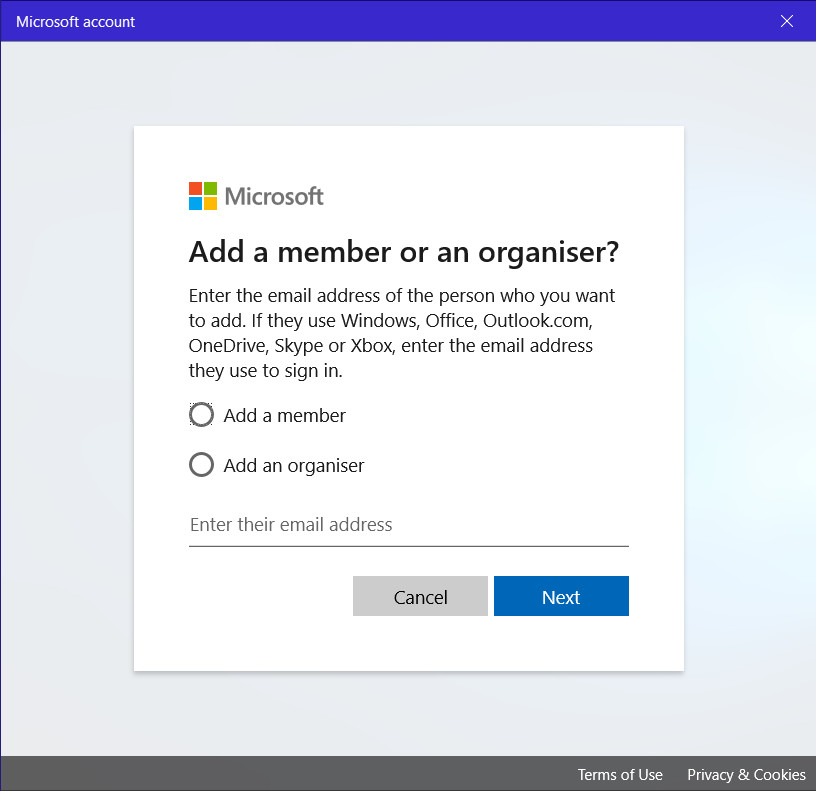
- Choose to add a member or organizer (essentially child and adult).
- Enter an email or mobile number for a Microsoft account. (If they do not have one, create one before proceeding.)
- Once accepted, you should be able to see them on the family dashboard.
It’s important that you have their Microsoft account configured on their devices (be it tablets or PCs). You can configure the account in Windows 10 easily, even if they’re already using it with another (or local) profile. Here’s how to do it:
- Hit Windows Key + Q to bring up the search.
- Input “Family”.
- Select Allow family members to use this PC from the list.
- Choose “Add a family member.”
- Select child.
- Enter their Microsoft account email address.
Setting restrictions
Once children have been added to the family safety center, you’ll be able to configure various settings and restrictions. You first need to select the child you wish to apply restrictions.
Screen time
You have two options when it comes to screen time. It’s possible to not only set certain hours during the day that kids can use their devices but also set a maximum time per device. This makes it possible to let them use devices for longer periods on weekends, for example. Here’s how:
- Choose “Screen time.”
- Either set a single schedule for all devices or turn on or off individual device schedules.
- Set the times during each day, you wish for the child to use their devices.
- Select “Add.”
- Select “Save.”
Websites
You likely don’t want your children to be able to access every website when online. Here’s how to configure website blocks:
- Choose “Web browsing.”
Turn on “Block inappropriate websites.”
- Microsoft, by default, blocks adult content and activates SafeSearch in most common search engines when this is active.
- Check the “Only see websites on the allowed list” if you wish to explicitly allow specific websites.
- You can manually approve or block websites by choosing the respective links and entering URLs.
Apps, games, and media
To restrict access to games, apps, and media, you can set an age-based rating level. This is then used by the Microsoft Store.
- Choose “App and game limits.”
- Locate the app or game you wish to set a limit.
- Set an appropriate time limit you wish for access to be unlocked for.
Child accounts can request access to specific content, which can be approved in the family safety center (see below). These app times are shared cross-platform, too.
Requests
Microsoft will fire out emails to adults when child accounts request access, but you can also handle requests from the dashboard. Simply select each child and approve or deny listed requests.
Spending
As well as being able to view the history of what a child has spent money on, it’s possible to add money to their Microsoft account, which can be used in games, or to buy apps and other content.
More Windows 10 resources
For more help articles, coverage, and answers on Windows 10, you can visit the following resources:
Entertainment, Microsoft, Technology, Uncategorized, Windows
Entertainment, Microsoft, Technology, Uncategorized, Windows


good post.
RépondreSupprimerkeep your kids safe